Die-lines for Packaging: Everything You Need to Know
If you're in the business of packaging products, then you need to know about die-lines. Die lines are the lines on a template that show where the product will be cut. They are very important for ensuring that your products come out looking their best. In this blog post, we will discuss everything you need to know about die-lines: what they are, how to create them, and how to use them effectively.
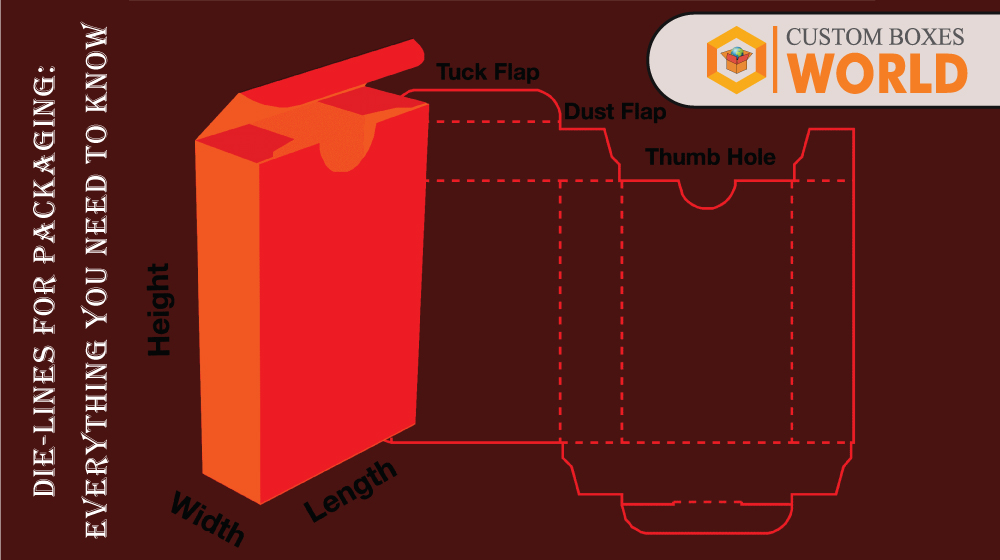
What are die-lines and what do they do?
When it comes to packaging, die-lines are an essential part of the design process. Simply put, die-lines are the lines that indicate where a score, fold, or cut will be made on a sheet of paper or cardstock. They help to ensure that the finished product will be the correct size and shape, and they can also be used to create interesting patterns or textures. Die-lines are typically created using vector graphics software, such as Adobe Illustrator. Once the design is complete, the die-line file is sent to a printer or packaging company, which will use it to create the final product. So, whether you're designing a box, a label, or a brochure, understanding how to use die-lines is an essential skill for any graphic designer.
How to create a die-line template?
A die-line is a vector line file that is used by printers and graphic designers to indicate the outlines of a print design. It is also known as a cutline and is used to indicate where the final product should be cut. Die-lines are generally created in Adobe Illustrator and use standard dimensions such as PANTONE or CMYK colors. The most important thing to remember when creating a die-line is to make sure that all of the lines are on a separate layer from the rest of the artwork. This will ensure that the printer can easily identify the die-line and prevent any errors during printing. To create a die-line template, simply create a new layer in Illustrator and draw out the outline of your design. Be sure to use standard dimensions and colors, and save the file as a .ai or .eps file. Once you have created your die-line, you can then send it to your printer or graphic designer for production.
How to use a die-line template effectively?
A die-line is a template that is used by graphic designers and printers to create packaging. The die-line will include all of the necessary folds, cuts, and score lines that are needed to create the final product. In order to use a die-line effectively, it is important to understand all of the different features that are included.One of the most important features of a die-line is the registration mark. This mark is used to help line up the different pieces of the packaging correctly during the printing process.
Read More : Get Packaging For Bath BombAnother important feature is the barcode. This barcode will be scanned when the package is being shipped, and it can contain information about where the package was made and where it needs to go.Additionally, die-lines often include bleed lines. These lines indicate where ink or varnish should be placed in order to create a nice, clean finished edge. Finally, die lines may also include trim lines. These lines indicate where the packaging should be cut in order to achieve the desired size and shape. By understanding all of these different features, you can use a die-line template effectively to create high-quality packaging for your products.
Tips for creating beautiful, effective packaging
You've spent hours perfecting your product and designing the perfect packaging to show it off. But before you can print your beautiful design, you need to create a die-line. A die-line is a template that indicates where the folds, cuts, and perforations will go on your packaging. It's essentially a map that tells the printer how to turn your flat design into a three-dimensional object. Creating a die-line may seem like a daunting task, but we're here to help. Here's everything you need to know about die-lines for packaging.The first step in creating a die-line is to decide on the size and shape of your package. Will it be a box, a bag, or something else? Once you've decided on the basic shape, you need to determine the dimensions.
visit us for : We are CBD Packaging boxes experts in USAMake sure to leave enough room for your product and any padding or filler material you plan to use. Once you have the basic shape and dimensions worked out, it's time to start adding the details.Start by indicating where the folds will go on your design. Then, add cut lines and perforation lines as needed. If your design includes a window, make sure to include die-lines for that as well. When creating die-lines for complex designs, it's often helpful to create a mockup of your packaging first. This can help you visualize the finished product and make sure all the elements are in the right place. Once you're happy with your design, simply transfer it onto the die-line template.Creating die-lines may seem like a lot of work, but following these simple steps will help ensure that your packaging turns out just the way you envision it.
 USA
USA UK
UK